Step by step guide to creating a header menu
Step by step guide to creating a header menu
Blog / CSS / Elementor / JS / WordPress Elementor
Reference Website: layout.precise3dhub.com > Brand Menu
step-by-step guide to creating a header menu in Elementor with dynamic hover effects using jQuery.
Step 1: Set Up Your Menu in WordPress
Create Your Menu:
- Go to your WordPress dashboard.
- Navigate to
Appearance > Menus. - Create a new menu if you haven’t already, and add the necessary menu items.
Assign Menu:
- Assign this menu to the appropriate menu location (e.g., Header Menu).
Step 2: Install and Activate Elementor
Install Elementor:
- Go to
Plugins > Add New. - Search for “Elementor”.
- Install and activate the plugin.
- Go to
Install Elementor Pro:
- Purchase and download Elementor Pro if you haven’t already, as the header customization requires the Pro version.
- Install and activate Elementor Pro by uploading the plugin zip file.
Step 3: Create a Header Template in Elementor
Navigate to Elementor Templates:
- Go to
Templates > Theme Builder. - Click on
Add Newand selectHeader.
- Go to
Design Your Header:
- Choose a pre-made header template or create one from scratch.
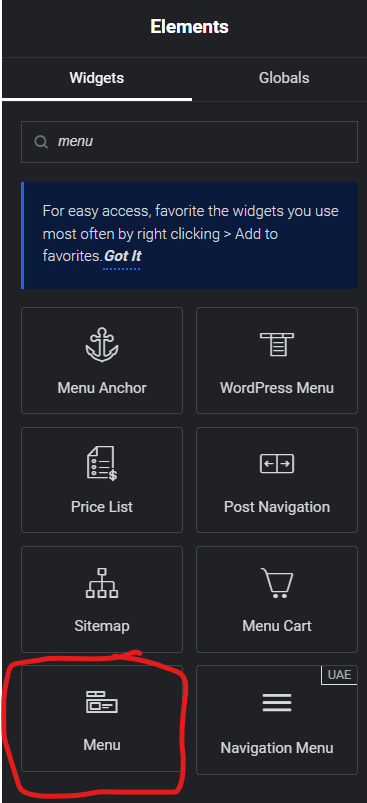
- Drag and drop a
Nav Menuwidget into your header.
Step 4: Add Custom CSS Class to Menu Items
- Edit Menu Items:
- Go to
Appearance > Menus. - Open each menu item and add a custom CSS class (e.g.,
pp-3dprint,ig-3dprint, etc.).
- Go to
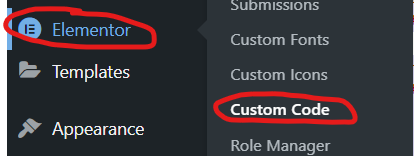
Step 5: Add jQuery and Custom CSS in Elementor
- Add Custom CSS:
- In Elementor, go to the header template.
- Click on the
Advancedtab of theNav Menuwidget. - Add the following custom CSS:
					/* Initially hide all image elements */
#fp-3dprint-img, #ig-3dprint-img, #mp-3dprint-img, #cp-3dprint-img, #scp-3dprint-img {
    display: none;
}
2. Add Custom jQuery:
- In Elementor, click on the header section (or any section where you want to add the script).
- Go to
Advanced > Custom CSS & JS. - Add the following jQuery script in the
Custom JSfield:
					<script>
jQuery(document).ready(function($) {
    // Initially hide all image elements
    $('#fp-3dprint-img, #ig-3dprint-img, #mp-3dprint-img, #cp-3dprint-img, #scp-3dprint-img').hide();

    // Handling hover for #pp-3dprint
    $('.pp-3dprint').hover(function() {
        $('#pp-3dprint-img').show();
        $('#ig-3dprint-img, #mp-3dprint-img, #fp-3dprint-img, #cp-3dprint-img, #scp-3dprint-img').hide();
    });

    // Handling hover for #ig-3dprint
    $('.ig-3dprint').hover(function() {
        $('#ig-3dprint-img').show();
        $('#pp-3dprint-img, #mp-3dprint-img, #fp-3dprint-img, #cp-3dprint-img, #scp-3dprint-img').hide();
    });

    // Handling hover for #mp-3dprint
    $('.mp-3dprint').hover(function() {
        $('#mp-3dprint-img').show();
        $('#ig-3dprint-img, #pp-3dprint-img, #fp-3dprint-img, #cp-3dprint-img, #scp-3dprint-img').hide();
    });

    // Handling hover for #fp-3dprint
    $('.fp-3dprint').hover(function() {
        $('#fp-3dprint-img').show();
        $('#ig-3dprint-img, #pp-3dprint-img, #mp-3dprint-img, #cp-3dprint-img, #scp-3dprint-img').hide();
    });

    // Handling hover for #cp-3dprint
    $('.cp-3dprint').hover(function() {
        $('#cp-3dprint-img').show();
        $('#ig-3dprint-img, #pp-3dprint-img, #mp-3dprint-img, #fp-3dprint-img, #scp-3dprint-img').hide();
    });

    // Handling hover for #scp-3dprint
    $('.scp-3dprint').hover(function() {
        $('#scp-3dprint-img').show();
        $('#ig-3dprint-img, #pp-3dprint-img, #mp-3dprint-img, #fp-3dprint-img, #cp-3dprint-img').hide();
    });

    // If no image is showing, show #pp-3dprint-img
    if (!$('#pp-3dprint-img').is(':visible') && !$('#ig-3dprint-img').is(':visible') && !$('#mp-3dprint-img').is(':visible') && !$('#fp-3dprint-img').is(':visible') && !$('#cp-3dprint-img').is(':visible') && !$('#scp-3dprint-img').is(':visible')) {
        $('#pp-3dprint-img').show();
    }
});
</script>
Step 6: Add Images to Your Header
- Add Image Elements:
- In the same header template, add
Imagewidgets for each of your images. - Assign each image an ID corresponding to the IDs used in the jQuery script (e.g.,
fp-3dprint-img,ig-3dprint-img, etc.).
- In the same header template, add
Step 7: Publish and Test
Publish Your Header:
- Click the
Publishbutton in Elementor. - Assign the header to the entire site or specific pages as needed.
- Click the
Test Your Hover Effects:
- Go to your website and hover over the menu items.
- Ensure that the corresponding images appear and other images are hidden as intended.
By following these steps, you can create a dynamic header menu in Elementor that enhances user experience with jQuery hover effects.

